Create Your First Project
Starting a new project in Craftology is the first step in turning an idea into a visual story. The platform helps transform a concept or script into a structured creative project that includes characters, environments, scenes, and eventually animated shots.
Craftology follows a guided storytelling workflow. The system interprets your idea, organizes it into narrative elements, and assists in generating the visual components needed for video production.
This guide walks you through the process of creating your first project and explains what happens at each stage.
Logging into Craftology
Before any project begins, there’s a small but important moment — entering the platform.
When you open Craftology, you’re greeted with a clean sign-in screen with a simple prompt Sign in to AI Portal at the center.
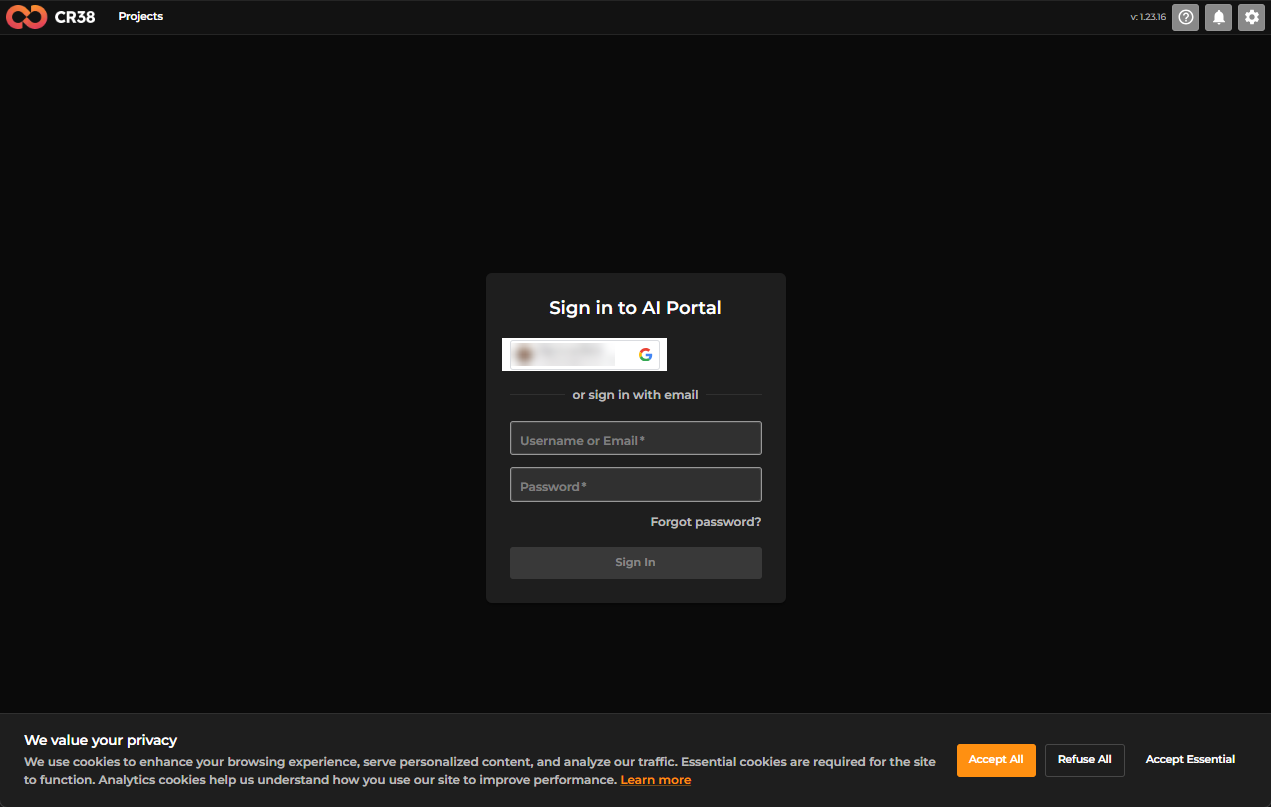
From here, you have two paths. Choose the one that fits how you work.
Signing in with Google
If you prefer speed and convenience, the Sign in with Google option is the quickest way in. Click the button, and a secure Google window will appear.
There, you’ll see your available accounts. Select the one you want to use, and confirm. Within seconds, you’re brought back into Craftology — no extra steps, no friction.
Signing in with Email
If you’re using a direct account, you can sign in with your credentials instead.
Enter your:
- Username or email
- Password
Then click Sign In.
If you’ve forgotten your password, there’s a Forgot password? link right below the field to help you recover access.
Note on Privacy
Before proceeding, you may notice a cookie banner at the bottom of the screen.
You can do one of the following:
- Accept all cookies
- Refuse non-essential ones
- Accept only essential cookies
Choose what feels right for you — Craftology will continue to work regardless.
Accepting the Beta Access Agreement
The first time you enter Craftology, you may encounter something slightly different — a pause before creation begins.
A modal appears titled Creator World – Beta Access
This isn’t just formality. It’s an agreement that outlines how the platform can be used during its beta phase.
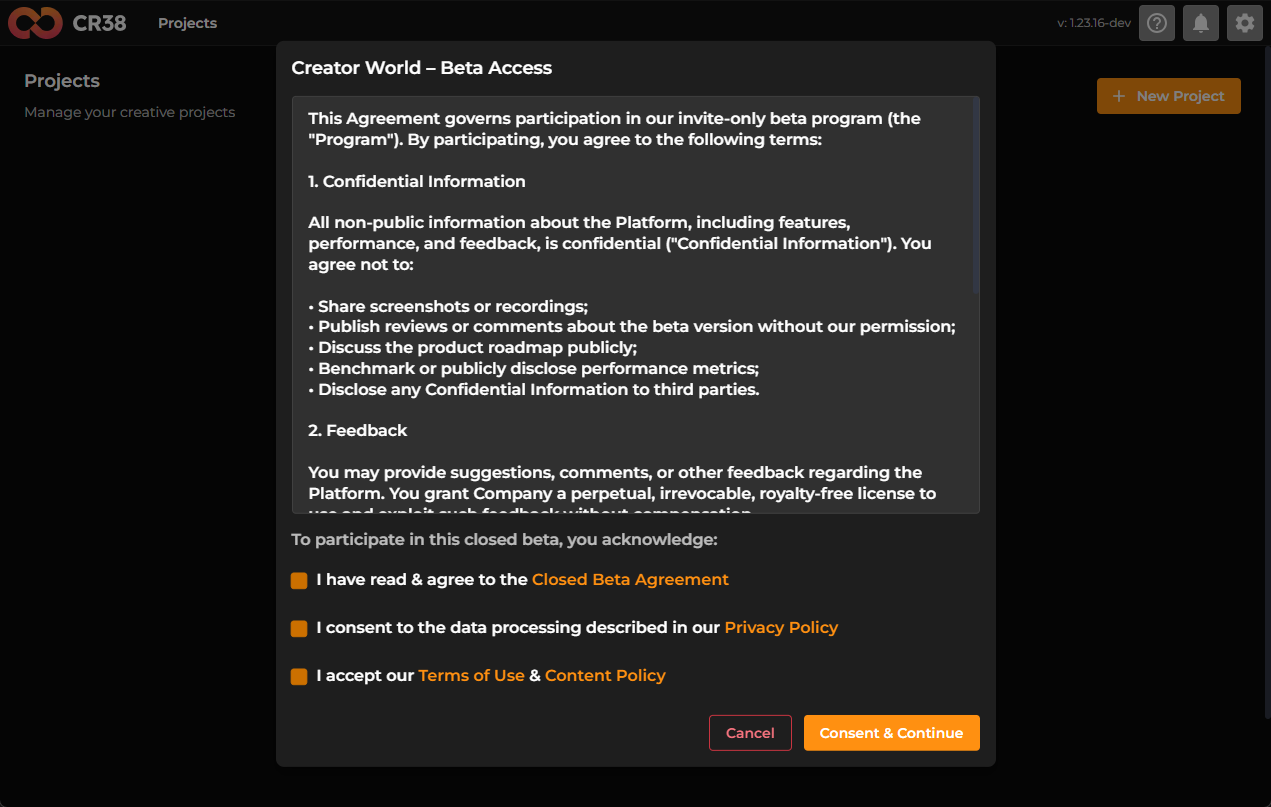
Inside, you’ll see key points around:
- Confidentiality of features and performance
- Responsible sharing (or rather, not sharing) of information
- How your feedback may be used to improve the platform
It’s worth taking a moment to scroll through and understand what you’re agreeing to.
Before continuing, you’ll need to actively confirm a few things.
You’ll see three checkboxes:
- Agreement to the Closed Beta Agreement
- Consent to the Privacy Policy
- Acceptance of the Terms of Use & Content Policy
These are required — until they’re checked, you won’t be able to proceed.
Once you’ve reviewed and selected all three, the “Consent & Continue” button becomes available.
Click it, and you move forward into the platform.
Step 1 — Creating a Project
When you first land in Craftology, you’re greeted by your project dashboard — a quiet overview of everything you’ve already created.
In the center, there’s a bright, inviting button: + New Project
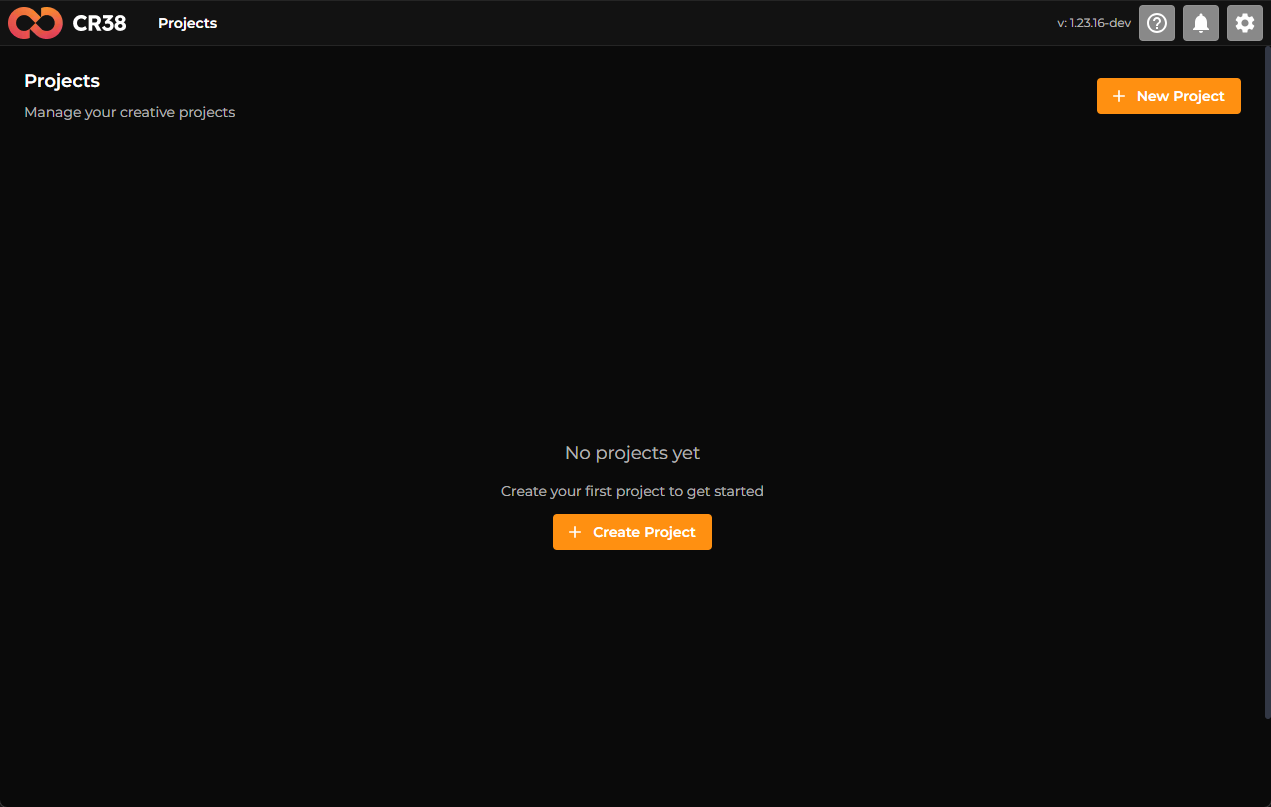
That’s your starting point. Click it, and you’re no longer just browsing — you’re creating.
Giving Your Project a Voice
The first screen feels a bit like naming a story before it’s written.
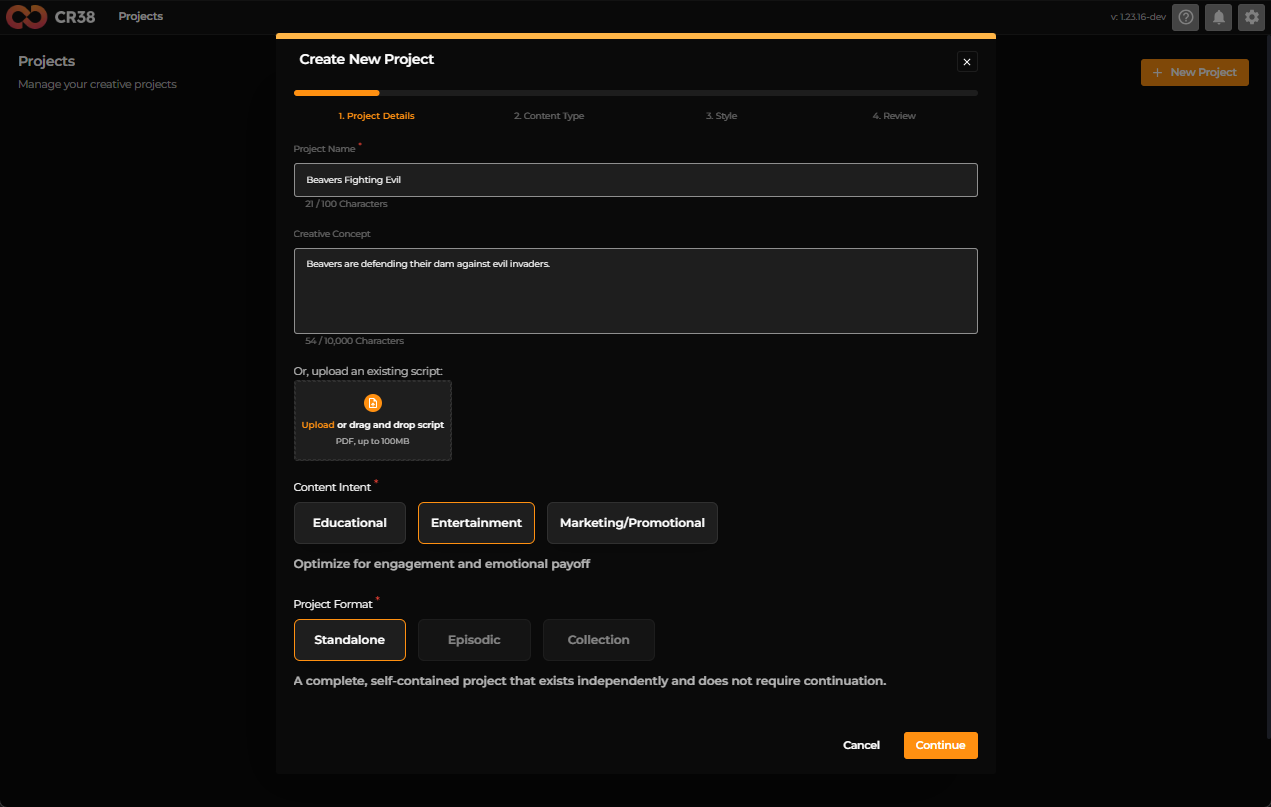
You’re asked to define:
- A Project Name — something meaningful, something you’ll recognize instantly later
- A Creative Concept — a short description of what this project is about
You can also upload a script if you already have one. If not, just describe your idea in your own words — simple is fine.
Then, gently shape its intent:
- Is it Educational, Entertainment, or Marketing/Promotional?
- Will it stand alone, or be part of something bigger (like a series)?
This step isn’t about perfection. It’s about direction. When it feels right, continue.
Defining the Experience
Now your project starts to take form.
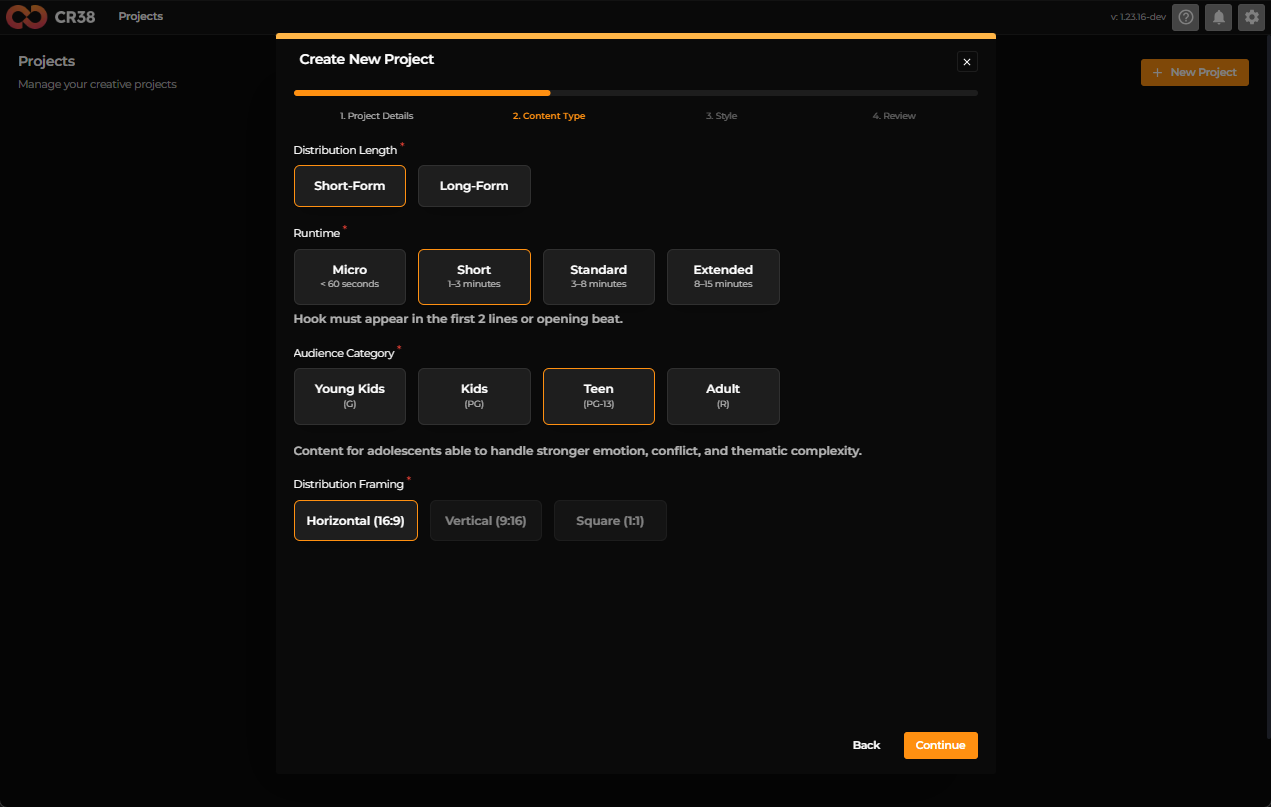
Here, you decide how your content behaves:
You choose whether it’s Short-form or Long-form, and define its rhythm — micro, short, standard, or extended.
You also decide who it’s for:
- Young kids, kids, teens, or adults
And how it will be viewed:
- Horizontal, vertical, or square format
This is where your project shifts from an idea into something watchable.
Choosing a Visual Identity
This step is where things get exciting.
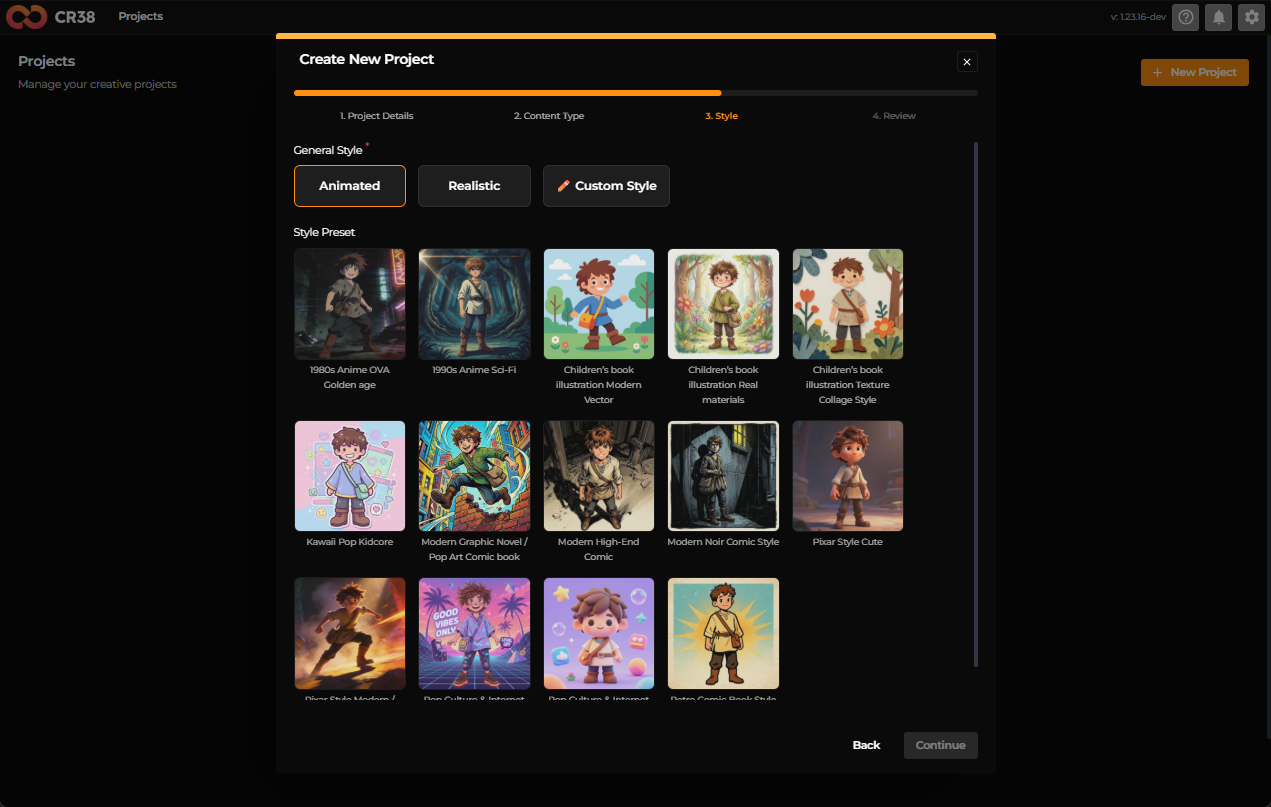
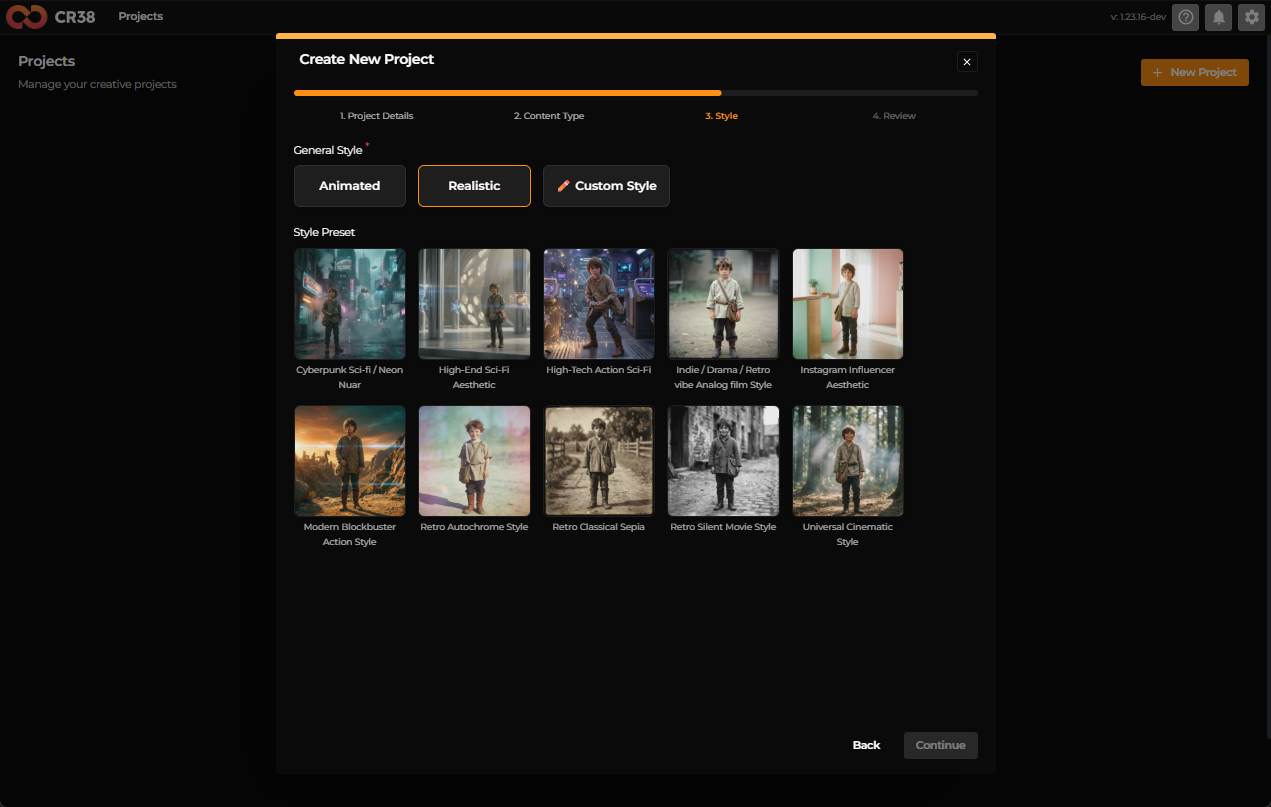
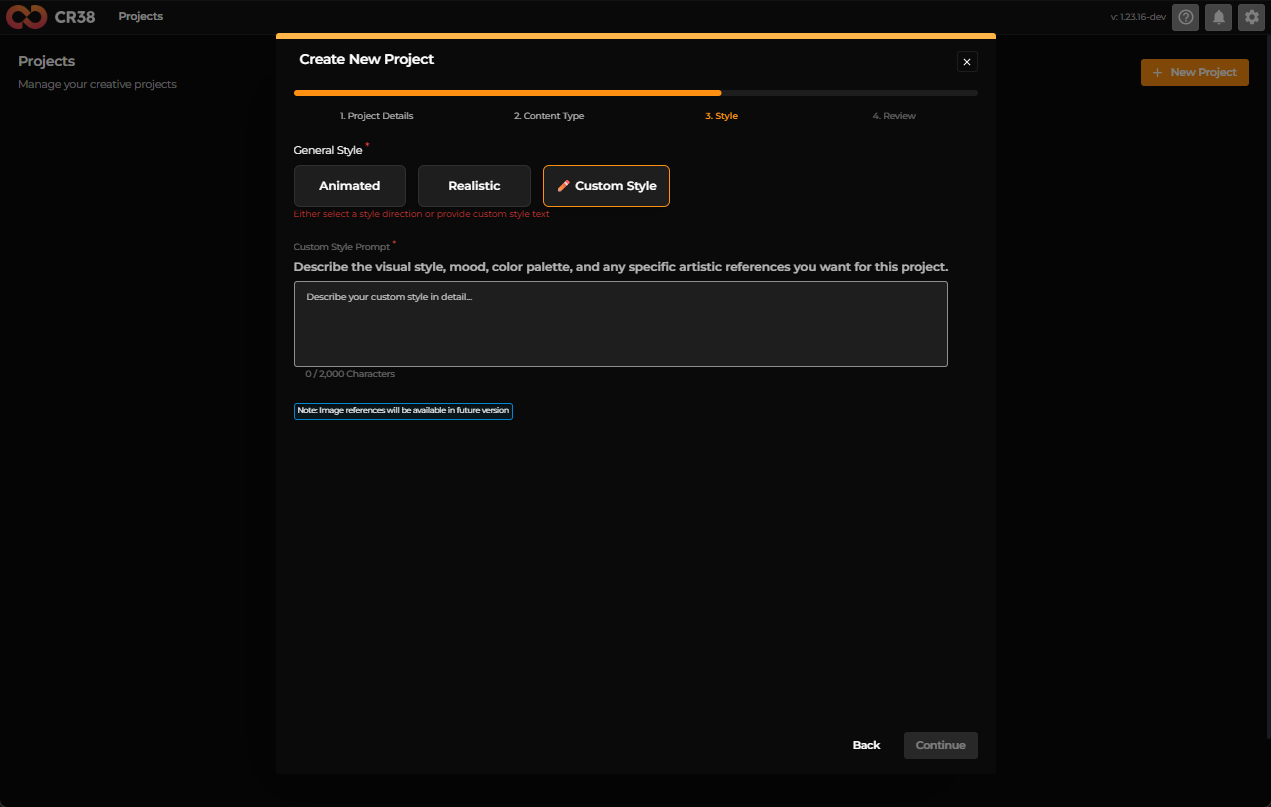
You’re presented with a range of styles — animated, realistic, or even a custom style.
Each option gives your project a distinct personality. Scroll, explore, and pick what feels right. There’s no wrong choice here — only the tone you want to set.
Reviewing Before Creation
Before the project is created, Craftology pauses with you for a moment.
You’re shown a clean summary:
- Your concept
- Format and audience
- Style choices
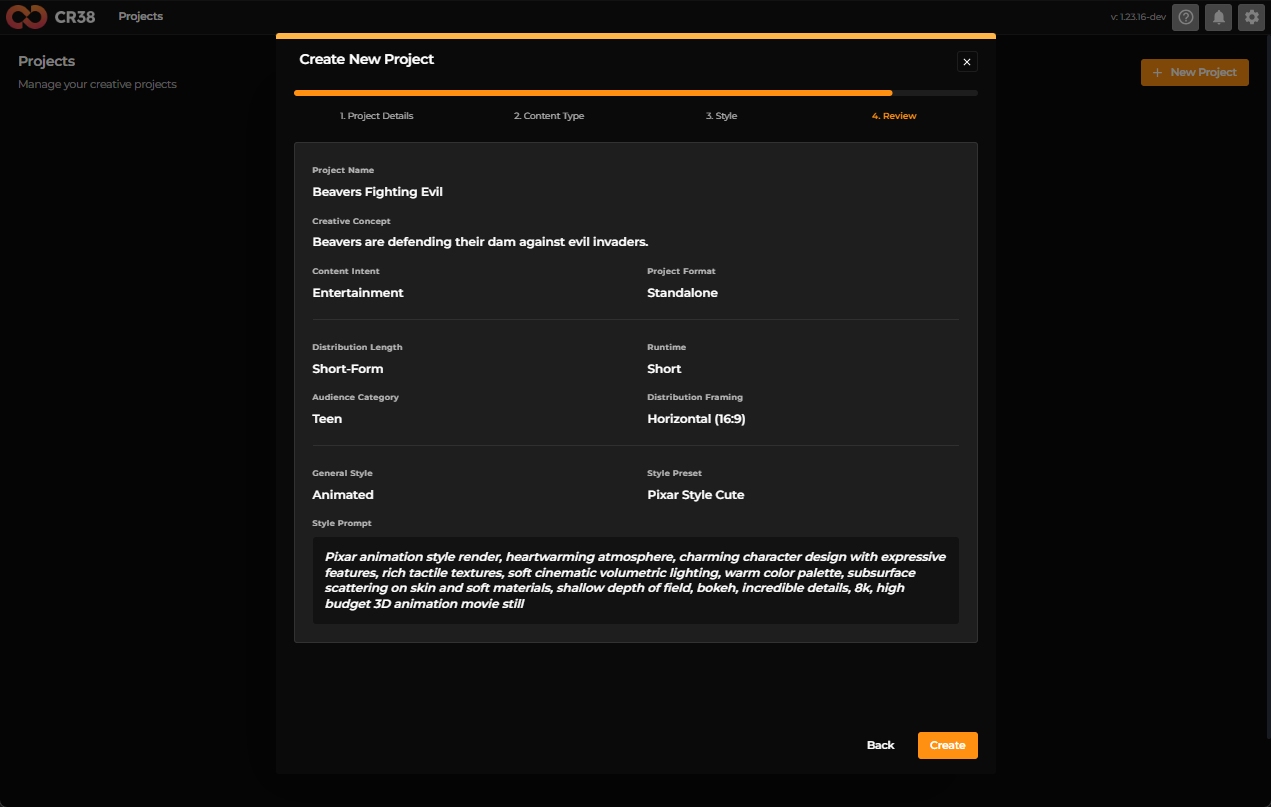
Take a breath here.
If something feels off, go back and adjust it. If everything aligns—go ahead and click Create.
Your project is now alive.
Inside Your Project
Once created, you’re taken into the project workspace. This is your creative control room.
![]()
Across the top, you’ll see areas like:
- Storycraft
- Assets
- Shots
- Editorial
- Memory
- Settings
On the left, a helpful AI chat assistant guides you through building your story — characters, world, themes, and more.
Your project isn’t just a file — it’s a growing system.
Adjusting Project Settings
At any point, you can refine your project.
Head to the Settings tab.
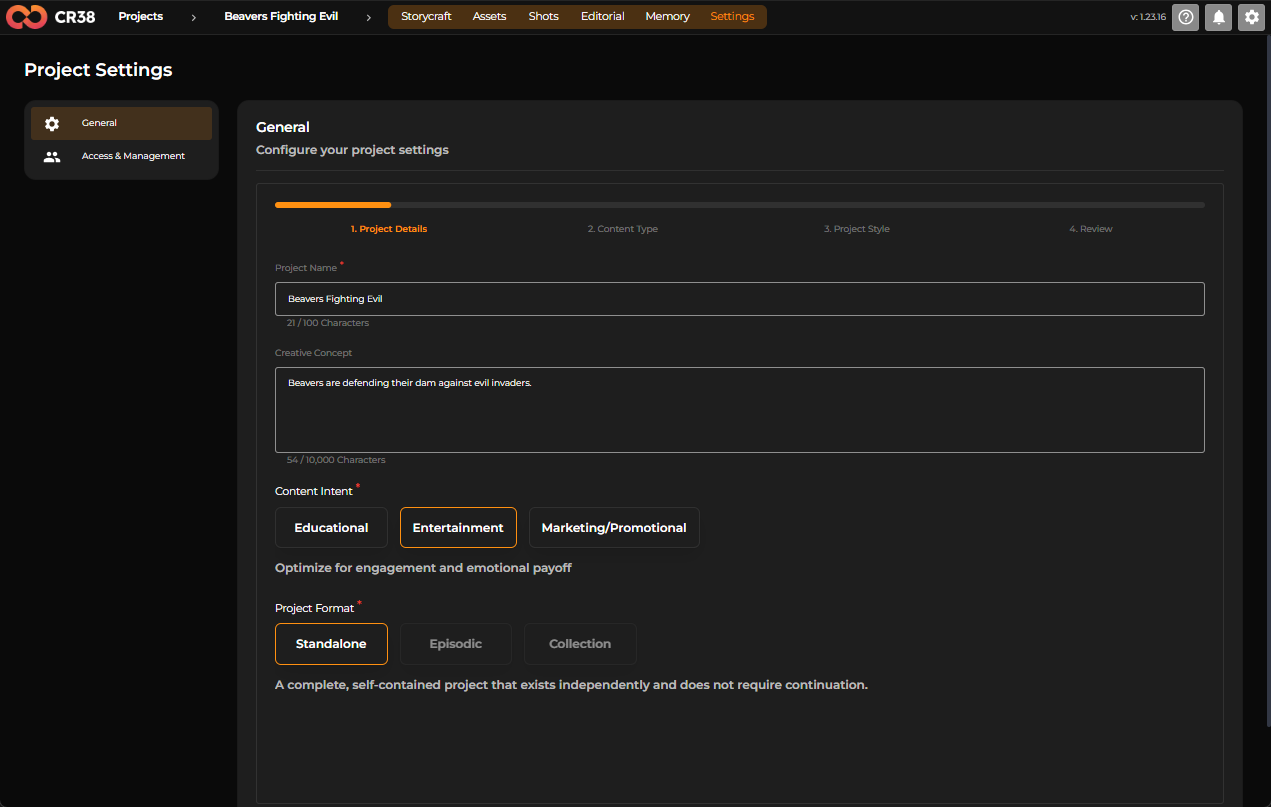
Here, you’ll revisit familiar fields you chose earlier when you created your project. This is where you fine-tune — not restart. Think of it as editing the core of your project.
Letting Go: Deleting a Project
At some point, you may decide that a project has reached the end of its lifecycle. Maybe it was an experiment, a draft that didn’t evolve, or simply no longer needed.
Craftology makes deletion intentional—never accidental.
To remove a project, begin inside the project itself.
Navigate to the Settings tab in the top navigation bar. Once there, open Access & Management from the sidebar. This section is primarily about permissions—but if you scroll down, you’ll find something more final.
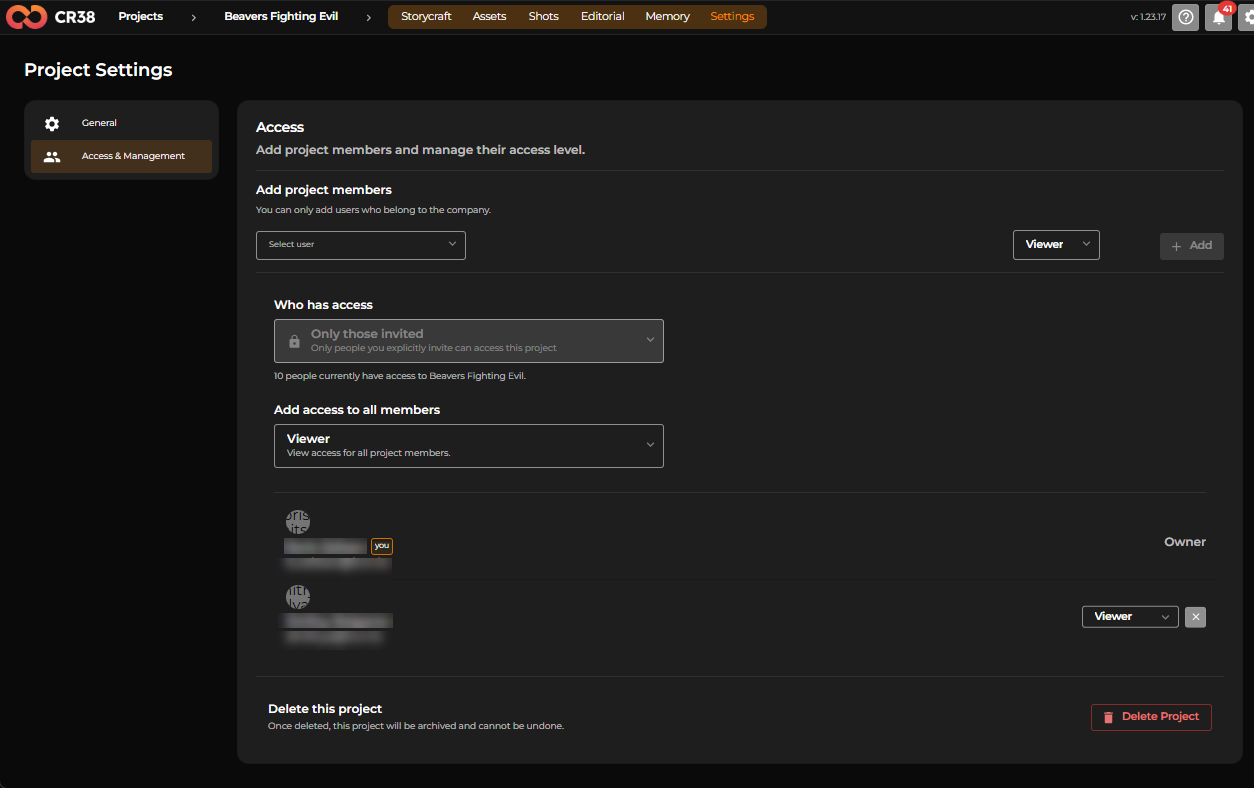
At the bottom of the page, there’s a clearly marked section:
“Delete this project.”
Next to it you can see a red button: Delete Project. This is your point of no return.
Clicking it doesn’t immediately erase your work. Instead, Craftology pauses and asks you to confirm. A dialog appears, clearly stating what’s about to happen:
This action will archive the project and cannot be undone.
This moment is deliberate.
If you’re certain, click Delete in the confirmation dialog. If not, you can safely cancel and return to your project.
Once confirmed, the project is archived and removed from your active workspace.
Warning
Deletion in Craftology is permanent. There’s no restore, no undo. So before you proceed, take a second look—make sure there’s nothing you might need later. When you’re ready, though, the path is simple and clear.
Step 2 — Working with Storycraft
Once your project is created, this is where things truly begin.
Storycraft is your creative engine — a space where ideas evolve into structured stories, characters come to life, and worlds take shape.
When you open the Storycraft tab, you’ll notice two main areas:
- On the left, a conversational assistant guiding and responding to your inputs.
- On the right, a structured workspace where your story is built step by step.
It’s not just a tool — it’s a collaboration.
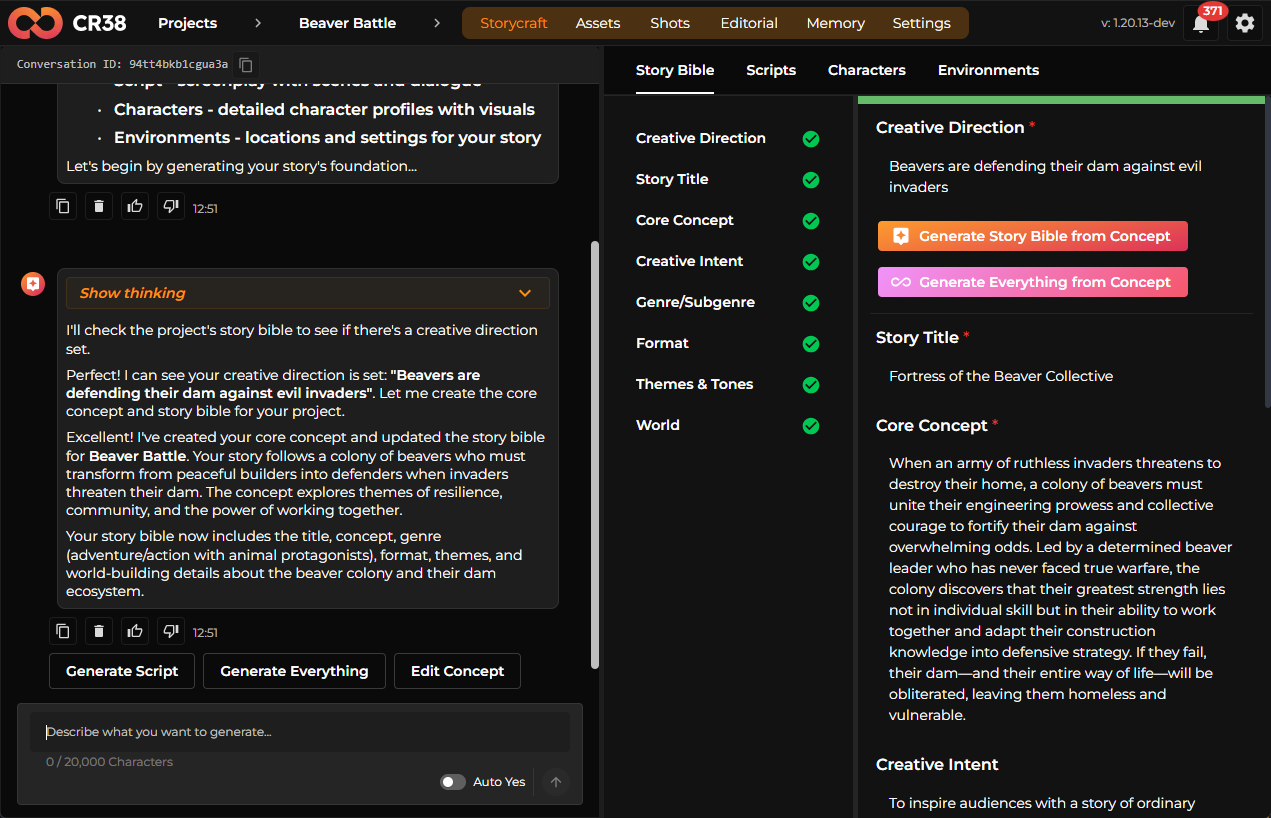
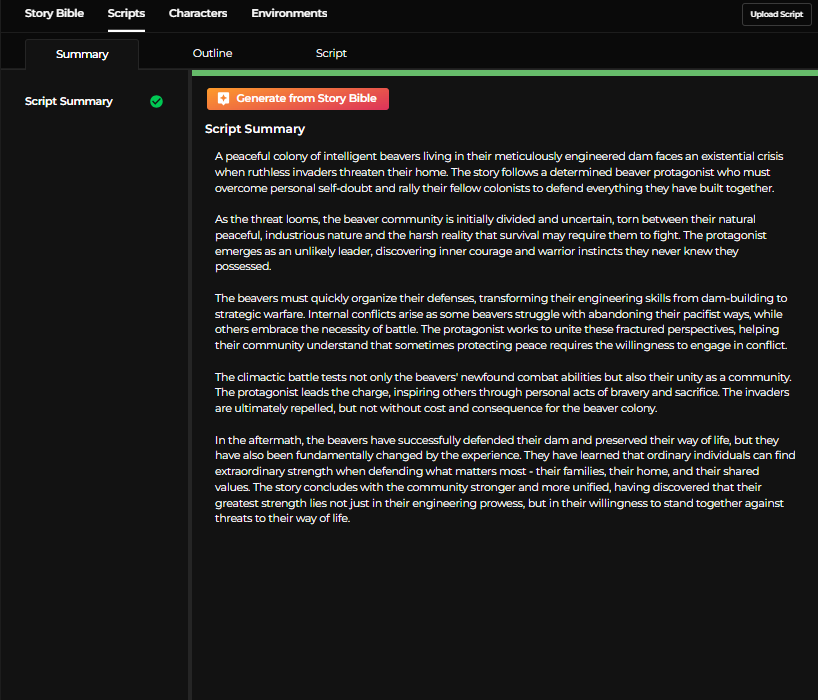
Building the Story Bible
Everything starts with the foundation.
In the Story Bible tab, you define the core of your story—its meaning, structure, and direction.
You begin with Creative Direction and Core Concept. These act as the seed of everything that follows.
From here, you can either:
- Let Storycraft expand your idea using “Generate Story Bible from Concept”
- Or go further with “Generate Everything from Concept”
As the system works, you’ll see progress unfold in real time — analyzing structure, tone, and narrative cohesion.
Gradually, your Story Bible fills in:
- Story Title
- Creative Intent
- Genre/Subgenre
- Format
- Themes & Tone
- World
Each section becomes a piece of a larger narrative system — aligned, consistent, and ready to grow. If something feels off, you can always refine it. Storycraft is iterative by design.
From Idea to Script
Once your Story Bible is in place, move to the Scripts tab.
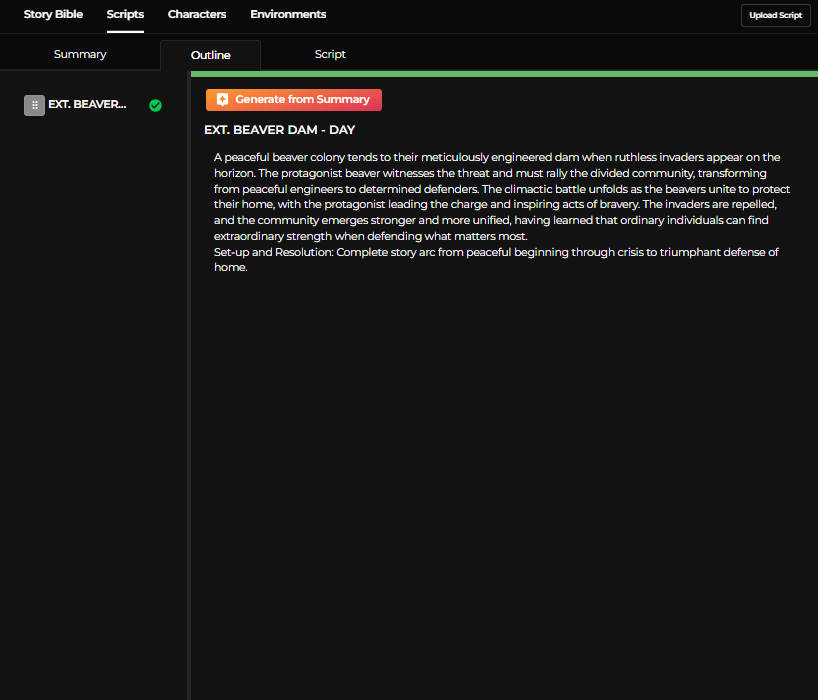
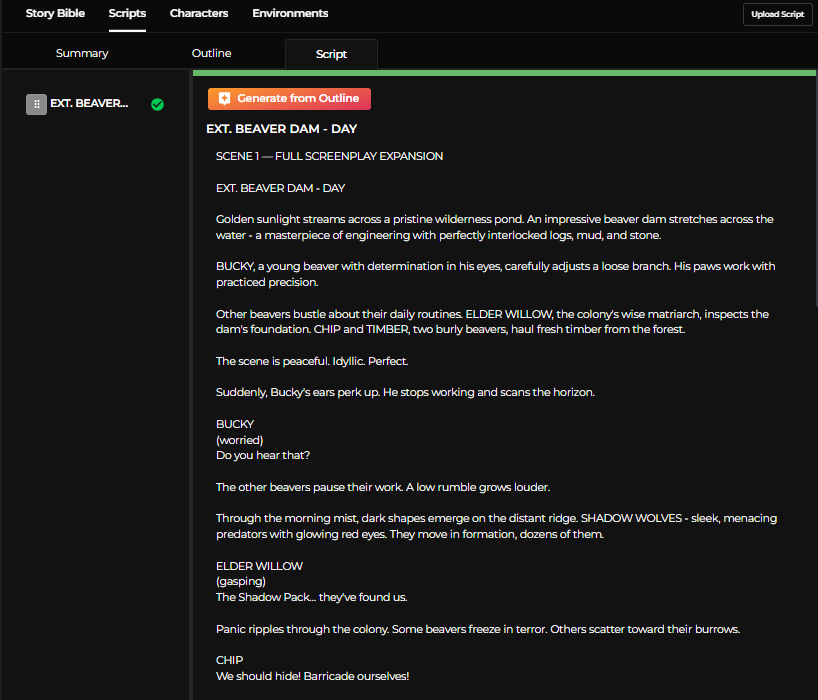
Here, your structured idea transforms into a narrative.
Start with Generate from Story Bible to create a script summary. This gives you a clear overview of your story’s flow — from beginning to climax to resolution.
The script emerges as:
- A cohesive storyline
- Defined narrative beats
- A clear progression of events
You can expand further into outlines and full scripts, refining as needed.
This is where your story begins to move.
Guidance
Small adjustments to descriptions can dramatically change the visual results generated later.
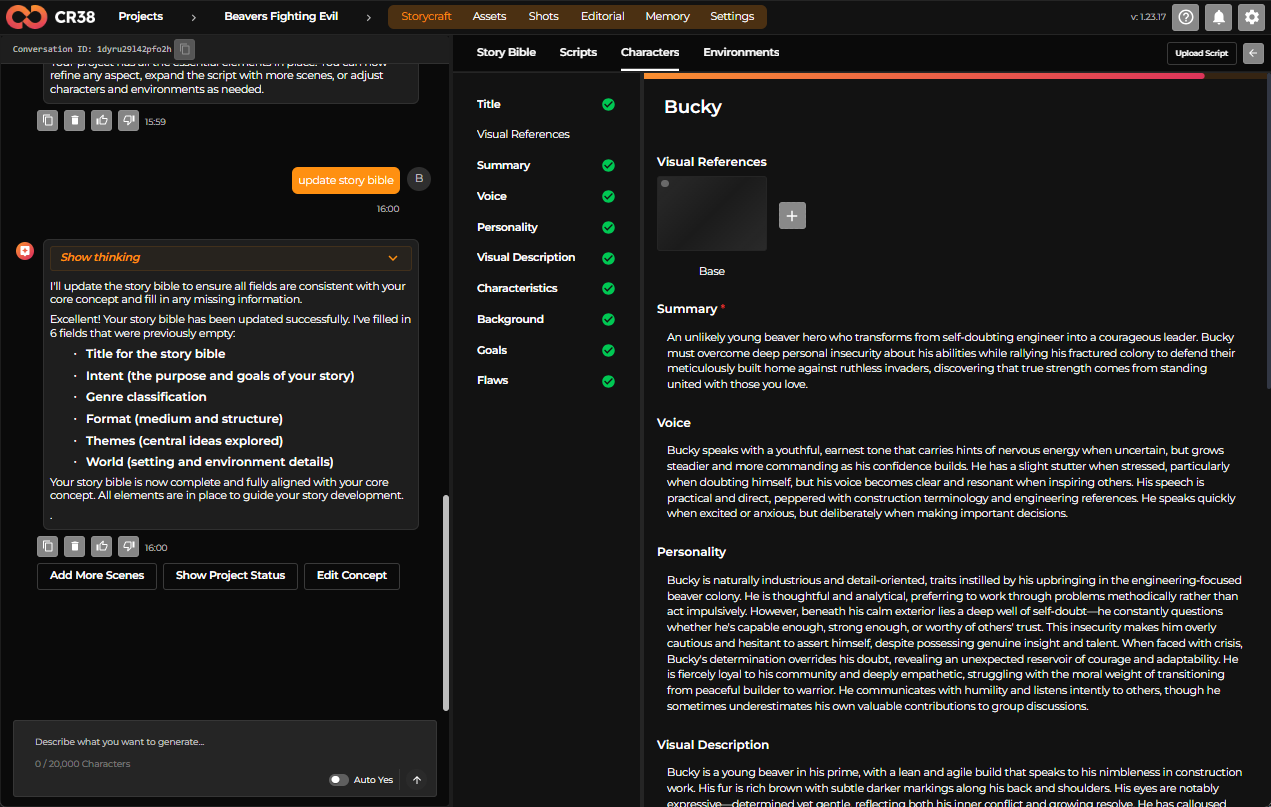
Creating Characters
Next, open the Characters tab. Your story now needs personalities.
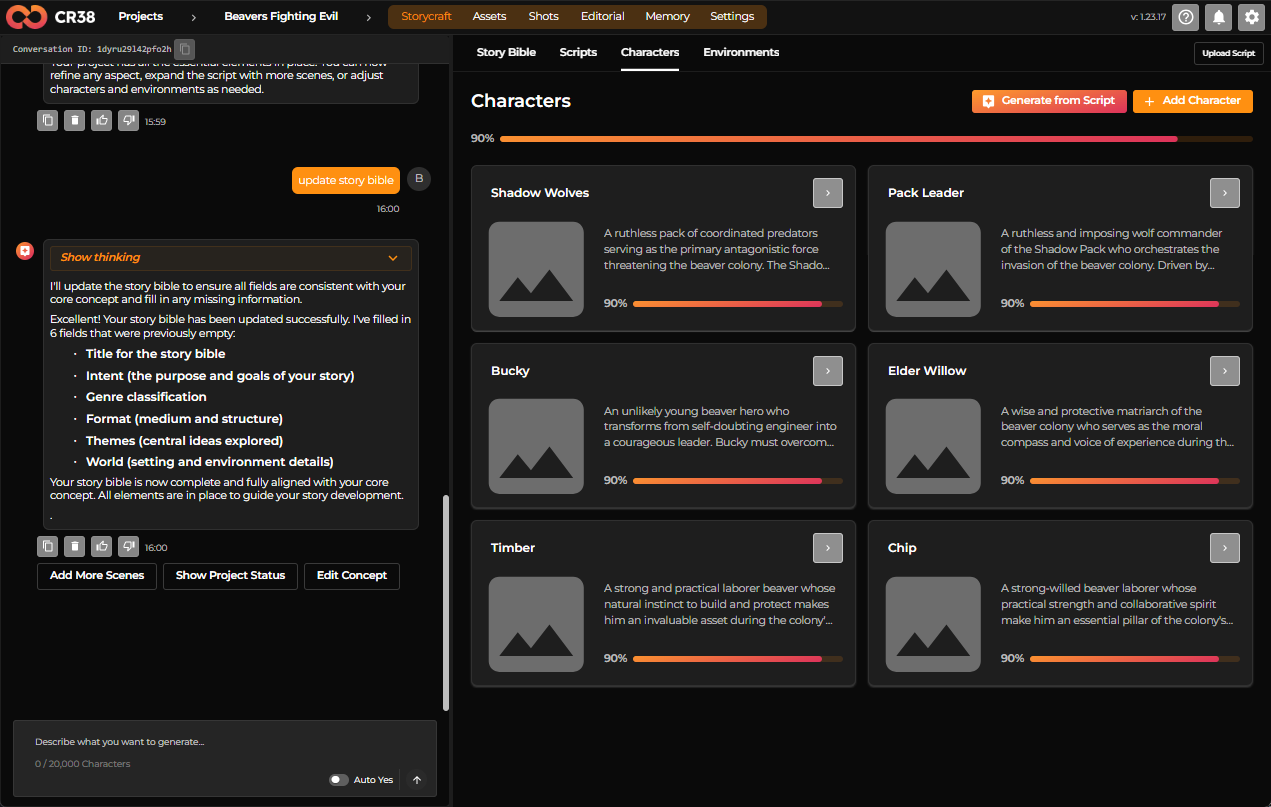
You can:
- Generate characters directly from the script
- Or add them manually
Each character appears as a card, gradually filling with depth:
- Role in the story
- Personality and traits
- Narrative importance
Each card contains a description and allows you to upload a base image used to generate visual versions of the character.
Designing Environments
Finally, move into Environments.
This is where your story takes place — the physical and emotional setting.
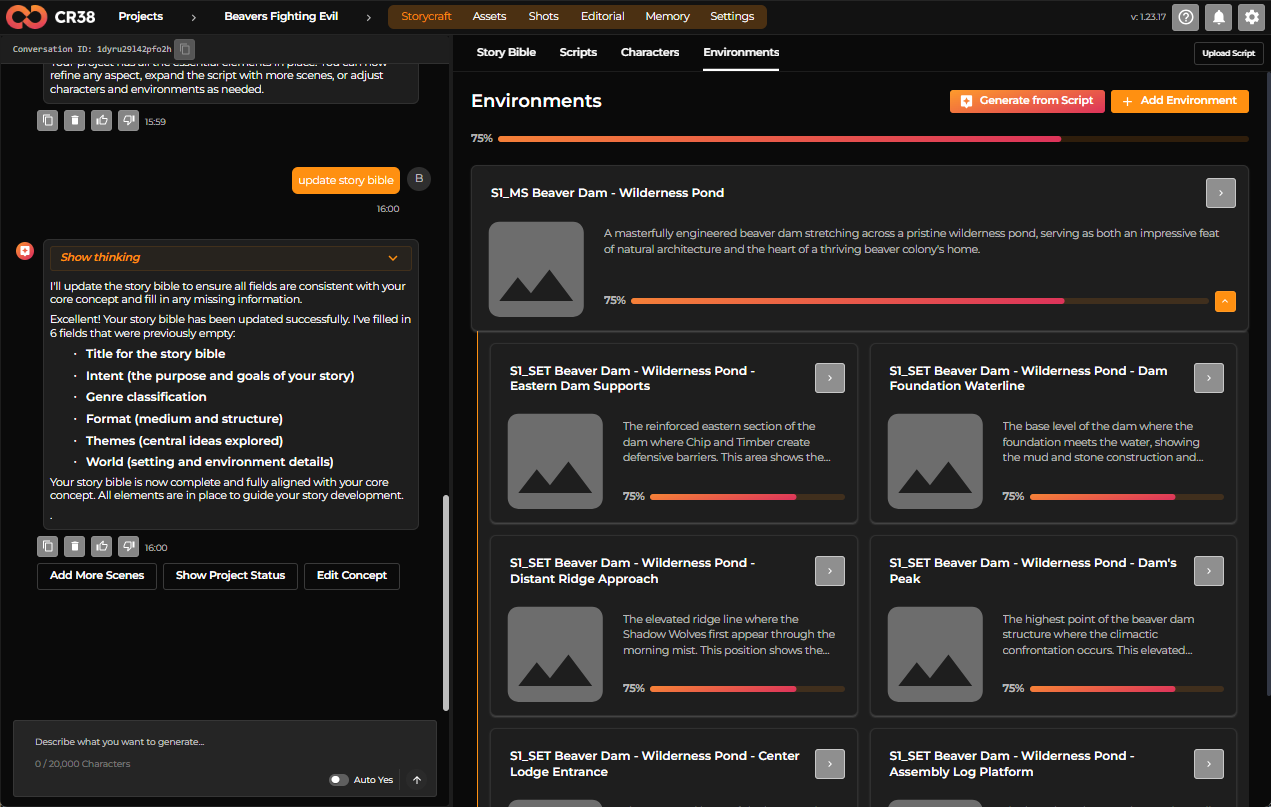
You can generate environments from the script, just like characters, or create them yourself.
Each environment represents a location or scene:
- A central setting
- Specific sub-locations (entrances, ridges, interiors)
They build a spatial understanding of your story—where things happen, and how those places connect.
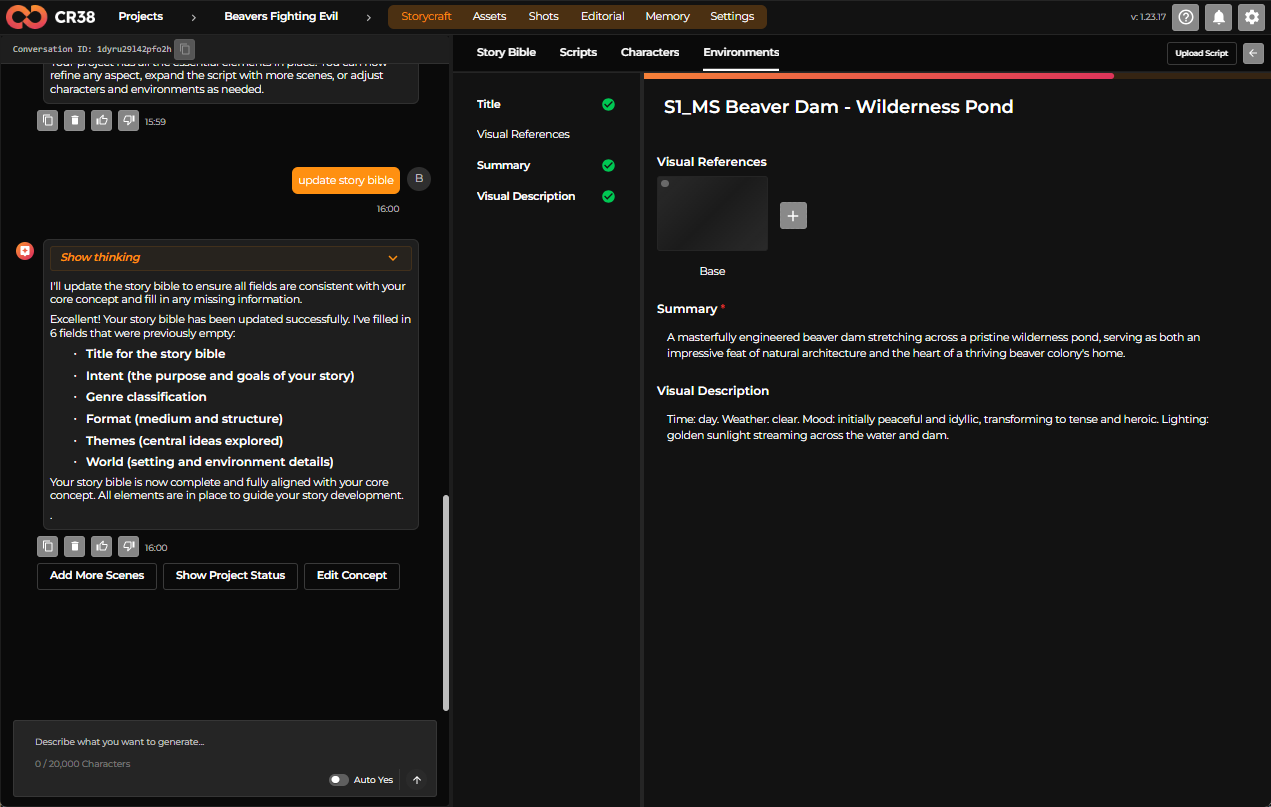
Just like characters, environments grow in completeness as you develop them.
Working with the Assistant
Throughout all of this, the assistant on the left is always present.
You can:
- Ask it to generate content
- Refine specific parts
- Expand scenes, characters, or ideas
It also shows its reasoning process — so you understand not just what is created, but why.
Bringing It All Together
Storycraft isn’t linear — it’s fluid.
You can move between Story Bible, Script, Characters, and Environments at any time. Each part informs the others, gradually forming a complete, cohesive project.
Start with an idea.
Let it grow.
Refine it as you go.
Step 3 — Create and review assets
Once the story structure is defined in StoryCraft, Craftology generates the visual elements required to produce the film. These elements are called assets.
Assets represent the core visual components of the story, such as characters and environments. They serve as reusable visual references that will later be used when generating shots and video sequences.
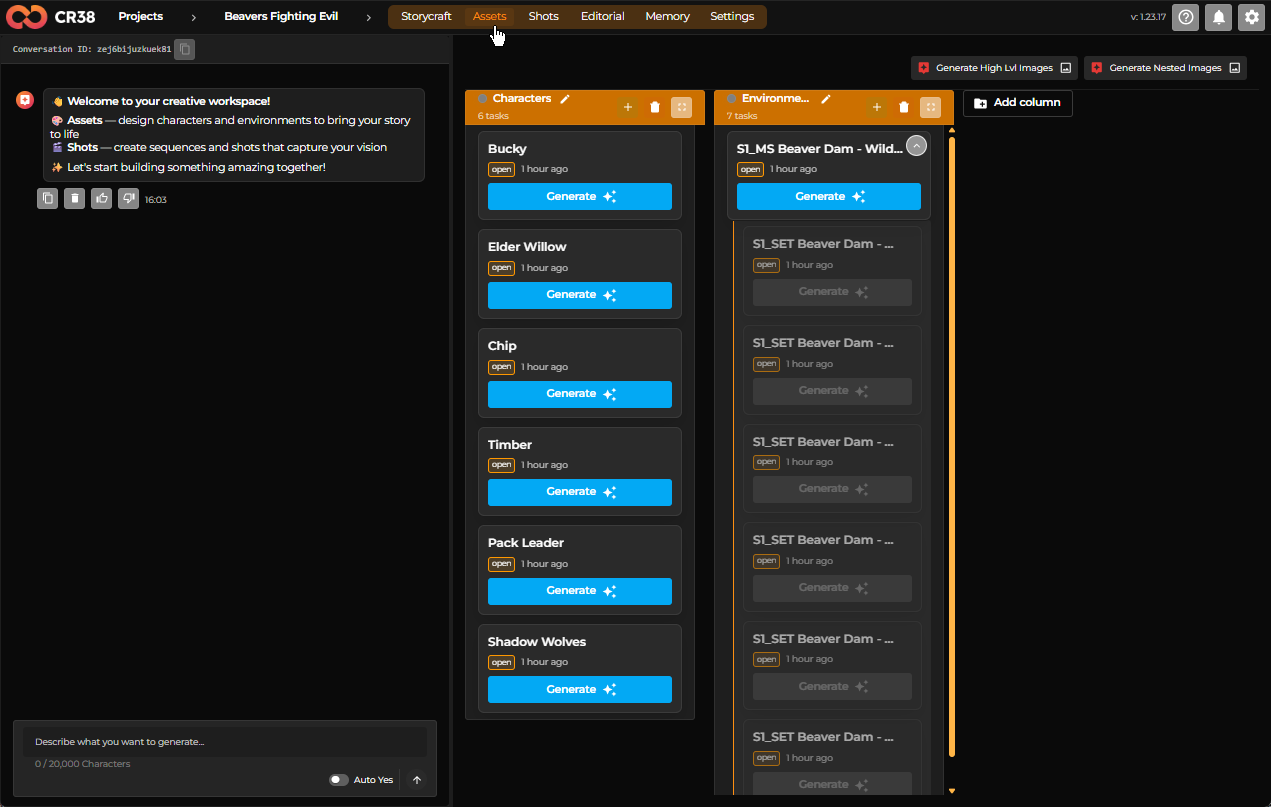
Instructions
- Navigate to the Assets section of the project.
-
Click the Generate All Images button to streamline the process. If there are nested assets, click Generate High Lvl Images first, and then Generate Nested Images to finalize image generation.
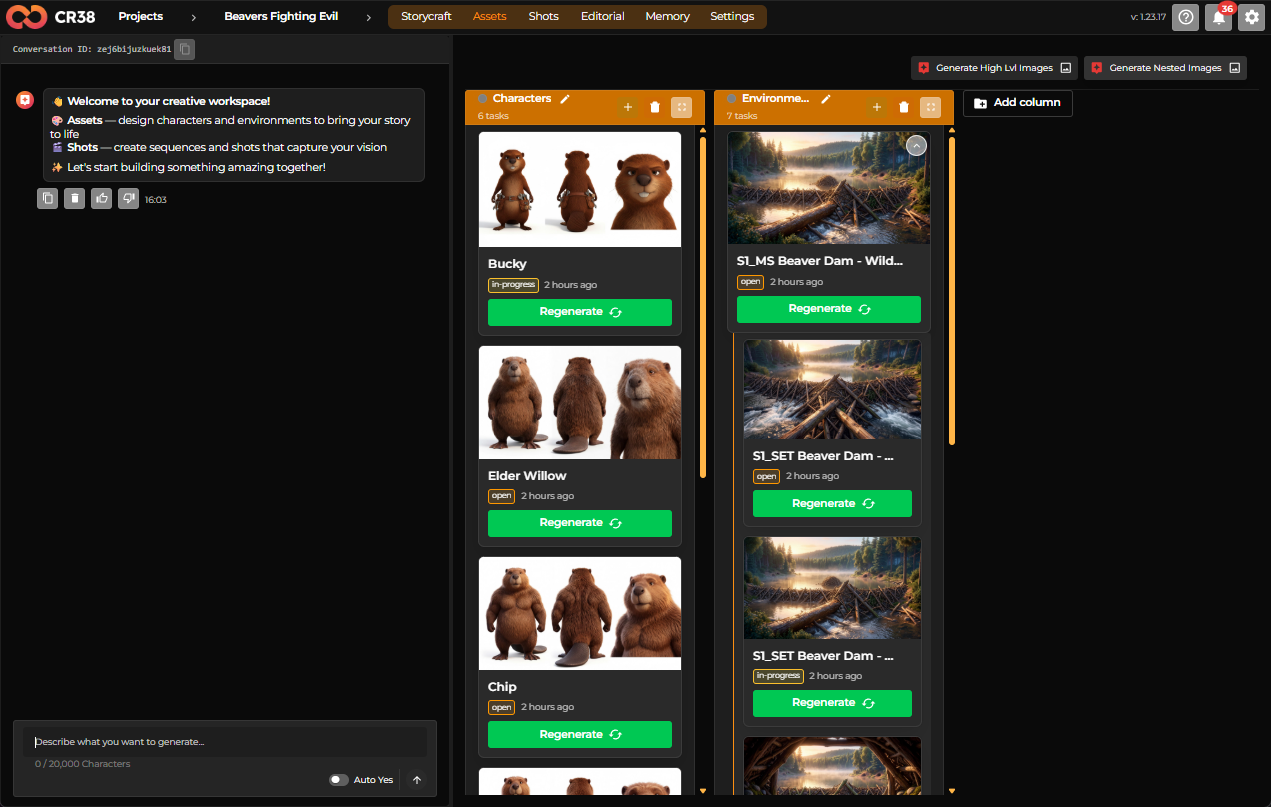
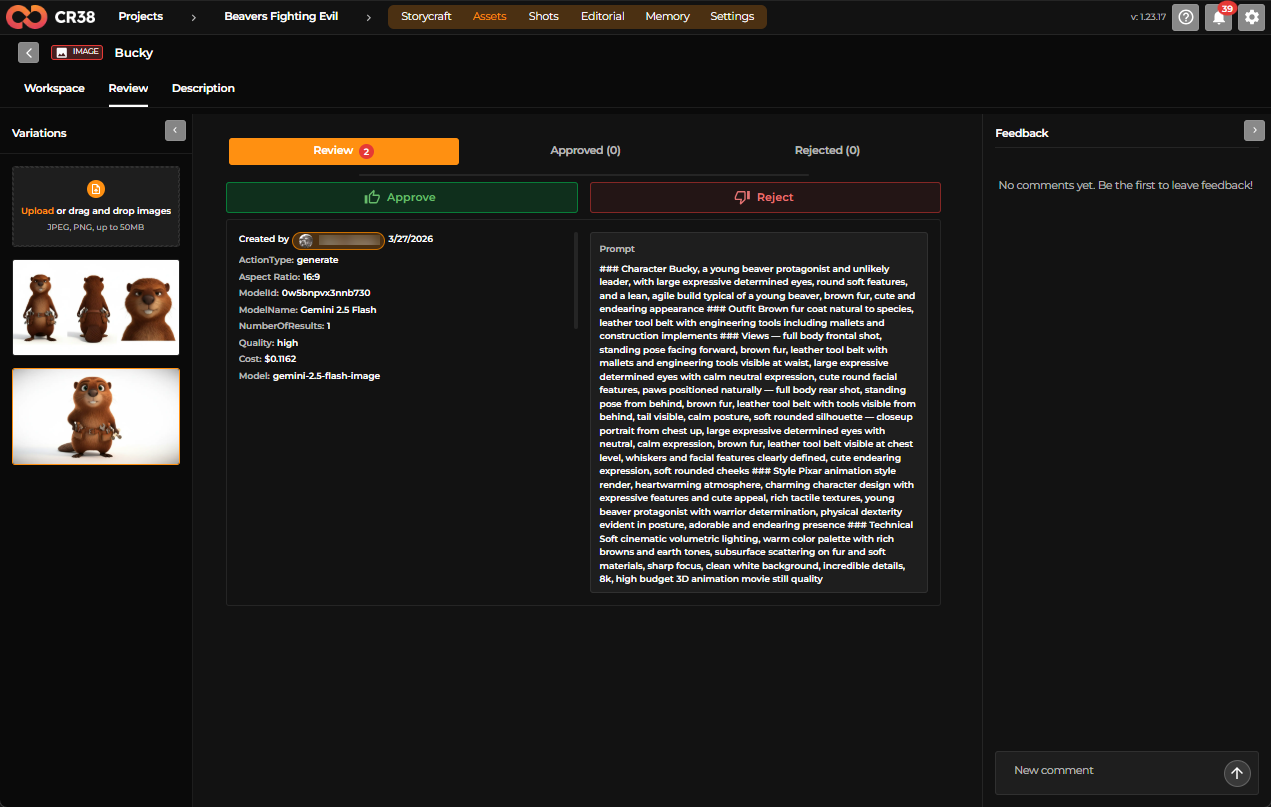
You can review an asset and re-generate it if necessary:
- Open an asset card to review its description and generation settings.
- Click Generate to create image variants for the asset.
- Review the generated images and choose the version that best matches your vision.
-
Send the selected image to Review and approve it.
Guidance
Treat assets as the visual foundation of your project.
Well-defined characters and environments help maintain consistency across all generated shots.
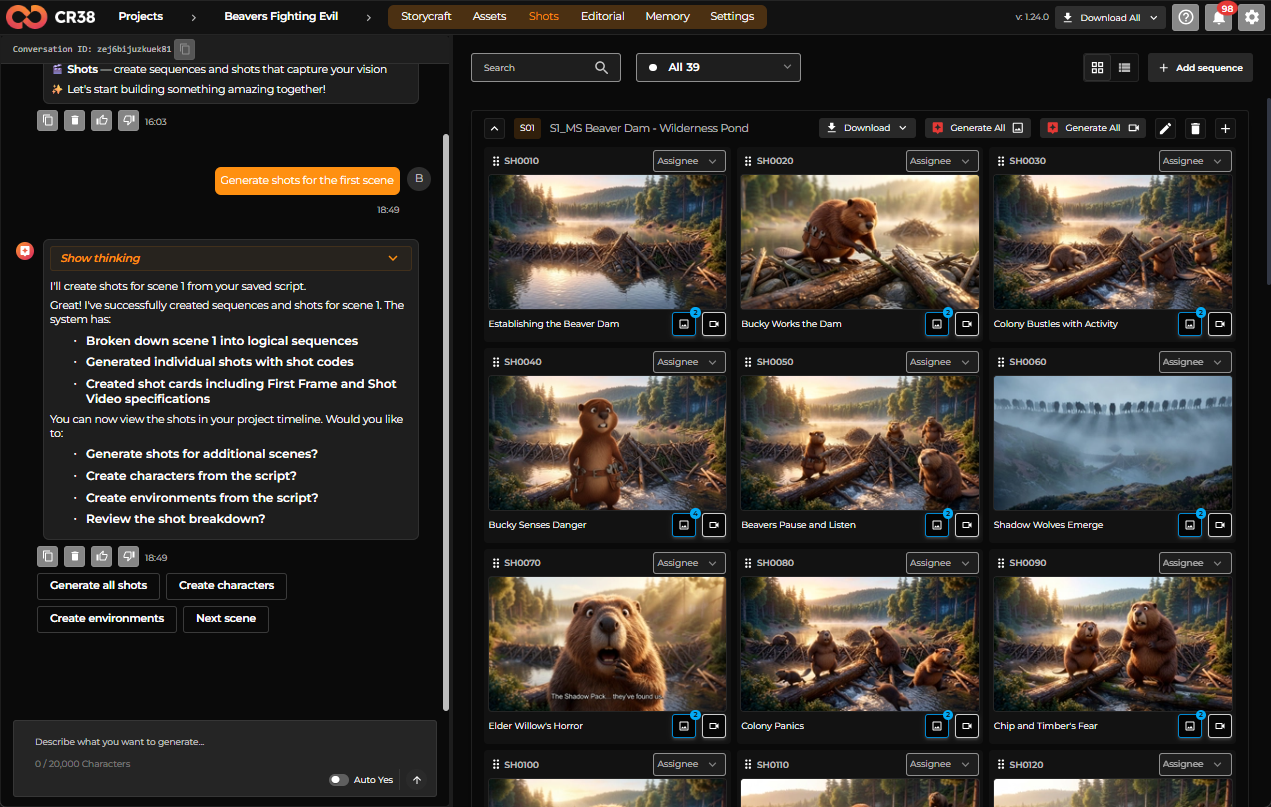
Step 4 — Generate scenes and shots
Once characters and environments are ready, Craftology organizes the story into scenes and shots.
Scenes describe narrative moments, while shots describe how the camera views those moments.
Instructions
-
Navigate to the Shots section of the project.
-
Type in
in the AI chat.
The result is as follows:
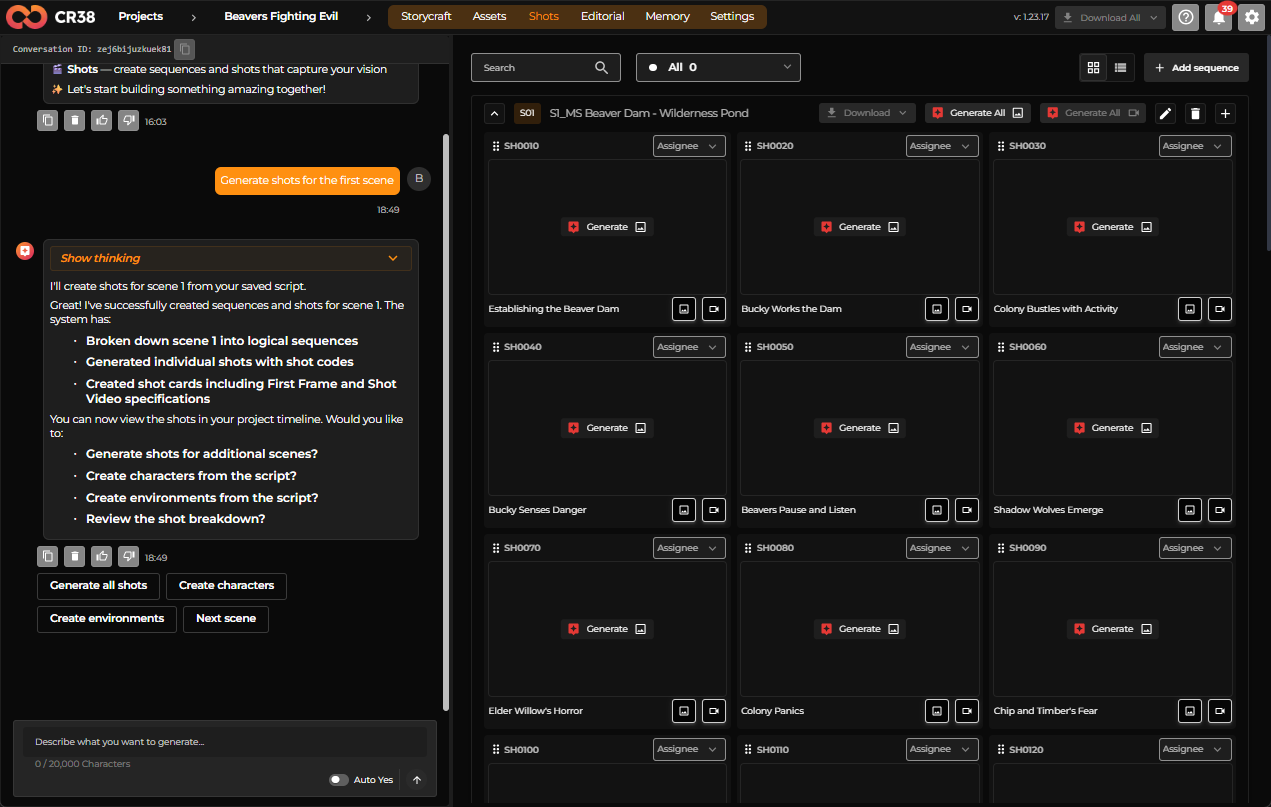
You can review the automatically generated shot descriptions and adjust descriptions if the scene composition does not match your vision.
Guidance
Think of this stage as a rough storyboard that outlines how the story unfolds visually.
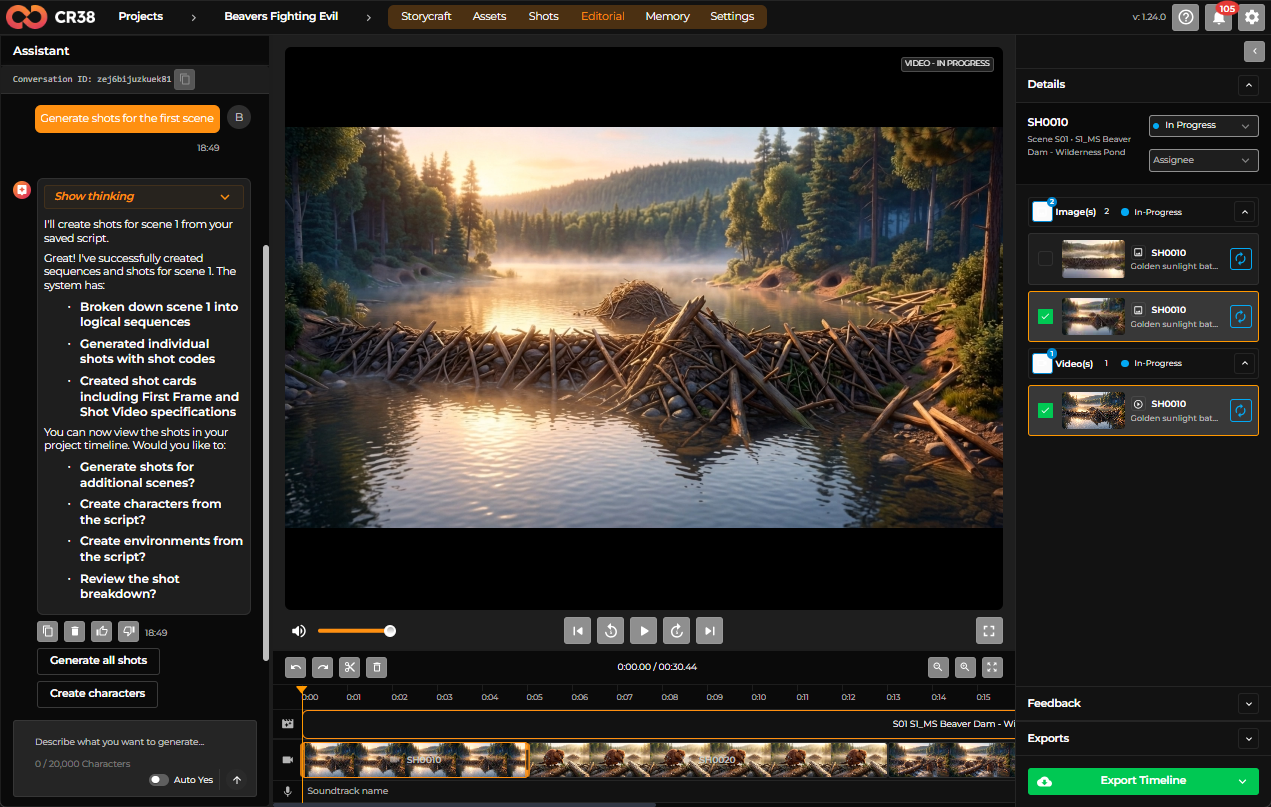
Step 5 — Generate start frames
Before creating animation, Craftology generates start frames, which are still images representing each shot.
These frames allow you to preview the visual composition of the scene.
Instructions
Click the Generate All button with an image icon to streamline the process.
You can click the Generate button in the middle of the shot's placeholder to generate a first frame for that shot, or click the Go to image chat button in the shot's bottom right corner to edit the shot.
Guidance
Fix visual issues at this stage rather than after video generation.
Step 6 — Generate video clips
Once the start frames look correct, Craftology can produce animated clips based on those frames and scene descriptions.
Instructions
Click the Generate All button with a video icon to streamline the process.

You can click the Go to video chat button in the shot's bottom right corner to work with each shot individually.
Guidance
Video generation uses the most computing resources, so make sure the storyboard images are correct first.
Step 7 — Assemble Timeline and Export Final Video
After video clips have been generated for each shot, the Editorial stage allows you to review the sequence, assemble the clips into a timeline, and export the final video.
Instructions
- Open the Editorial tab for the project.
- Review the automatically assembled timeline containing all generated clips.
- Play the sequence to verify pacing, continuity, and visual consistency.
- If necessary, return to the Shots stage to regenerate clips.
- Click Export Timeline to render the final video.
Guidance
Ensure that all clips are fully generated and reviewed before exporting. Any changes to shots or assets may require regenerating clips before producing the final video.
What to do next
Your first project helps you understand how ideas evolve into structured visual content within Craftology.
As you gain experience, you will learn how to refine descriptions, guide the system more precisely, and maintain visual consistency across scenes.
Continue learning with these guides:
- Understanding the Craftology Workflow
- How to Create a Shot
- How to Maintain Character Consistency Across Scenes